Connecting To Your Raspberry Pi - Via SSH Behind Windows Firewall
Have you ever found yourself wanting to get to your little Raspberry Pi computer, perhaps to tinker with a project or just check on things, but it feels like there's a big, invisible wall in the way? Many folks, you know, keep their tiny digital helpers at home, tucked away, and then find it a bit of a puzzle to reach them from another spot, especially when a Windows computer is standing guard. It's a common situation, really, where your home setup might have a protective shield, often called a firewall, that keeps outside access from getting in too easily. This shield is good for keeping things safe, yet it can make it a little tricky to send commands to your Pi from afar.
- Richard Ayoade Mandalorian
- Crystal Coture Dress To Impress
- Sharkboy And Lavagirl Floating Face
- How Tall Is Rene%C3%A9 Rapp
- Mythbusters Cast Death
This whole idea of talking to your Pi from a distance often involves something called SSH, which is a secure way to send instructions. It's like having a private, coded conversation with your Pi, so only you can tell it what to do. The thing is, your Windows computer, with its built-in security features, might block this conversation by default. It's not trying to be difficult, just trying to keep your home network secure. So, getting these two to chat, your remote access tool and your Pi, can take a few adjustments to your Windows computer's protective settings.
This piece will walk you through how to set things up so you can comfortably link up with your Raspberry Pi, even when a Windows computer's security barrier is in place. We'll look at the simple steps to make sure your Pi is ready to listen, how to adjust that Windows protective shield, and then how to get the messages flowing securely between your remote spot and your tiny computer. It’s actually pretty straightforward once you know where to make the small changes, and you'll soon be sending commands to your Pi without a hitch, more or less.
- Wwwmiu Shirominecom
- What Is Simp
- Patrick Mahomes Heritage
- What Is Gojos Last Name
- Heb Credit Cards Accepted
Table of Contents
What's the Big Idea with Connecting to Your Pi?
Getting Started with SSH on your Raspberry Pi
Why Does a Windows Firewall Make Things Tricky?
Making Space in Your Windows Firewall for Pi Connections
How Do We Get Through the Firewall Via SSH?
Setting Up Port Forwarding for Your Raspberry Pi
Any Other Things to Keep in Mind for Via SSH Access?
Keeping Your Raspberry Pi Connection Secure
What's the Big Idea with Connecting to Your Pi?
When you have a Raspberry Pi, it's a wonderfully versatile little machine that can do so many things, from running a small home server to being a media center. But, you know, sometimes you don't want to have a screen, keyboard, and mouse always hooked up to it. That's where connecting to it remotely becomes a real time-saver. It lets you send commands and work with your Pi as if you were right there, but from another computer, perhaps even one far away. This way of working is often called "headless" operation, meaning no screen is needed on the Pi itself, which is quite convenient, really.
The main way people talk to their Raspberry Pi from another spot is through something called Secure Shell, or SSH for short. Think of SSH as a very secure tunnel for your commands and information. It makes sure that whatever you send to your Pi, and whatever the Pi sends back to you, stays private and protected. It's a bit like sending a sealed letter through a special, guarded chute. This method is the go-to for most folks who want to manage their Pi without having to physically interact with it, and it's something you will find quite useful, too it's almost.
Using SSH means you type commands into a terminal window on your main computer, and those commands go straight to your Pi, which then carries them out. This is great for updating software, running scripts, or even just checking how much space is left on your Pi's storage. It's a powerful tool that gives you full control over your little computer, all from the comfort of your desk, or even from a coffee shop, provided you've set things up correctly at home. So, getting this part right is a pretty big step for anyone with a Raspberry Pi, as a matter of fact.
Getting Started with SSH on your Raspberry Pi
Before you even think about getting past any protective shields, your Raspberry Pi needs to be ready to accept these secure conversations. When you first set up your Pi, particularly with newer versions of its operating system, the SSH feature might not be turned on by default. This is a security measure, just so you know, to keep unwanted guests out. But for you to connect, you'll need to flip a switch, so to speak, to allow it to listen for your commands, you know.
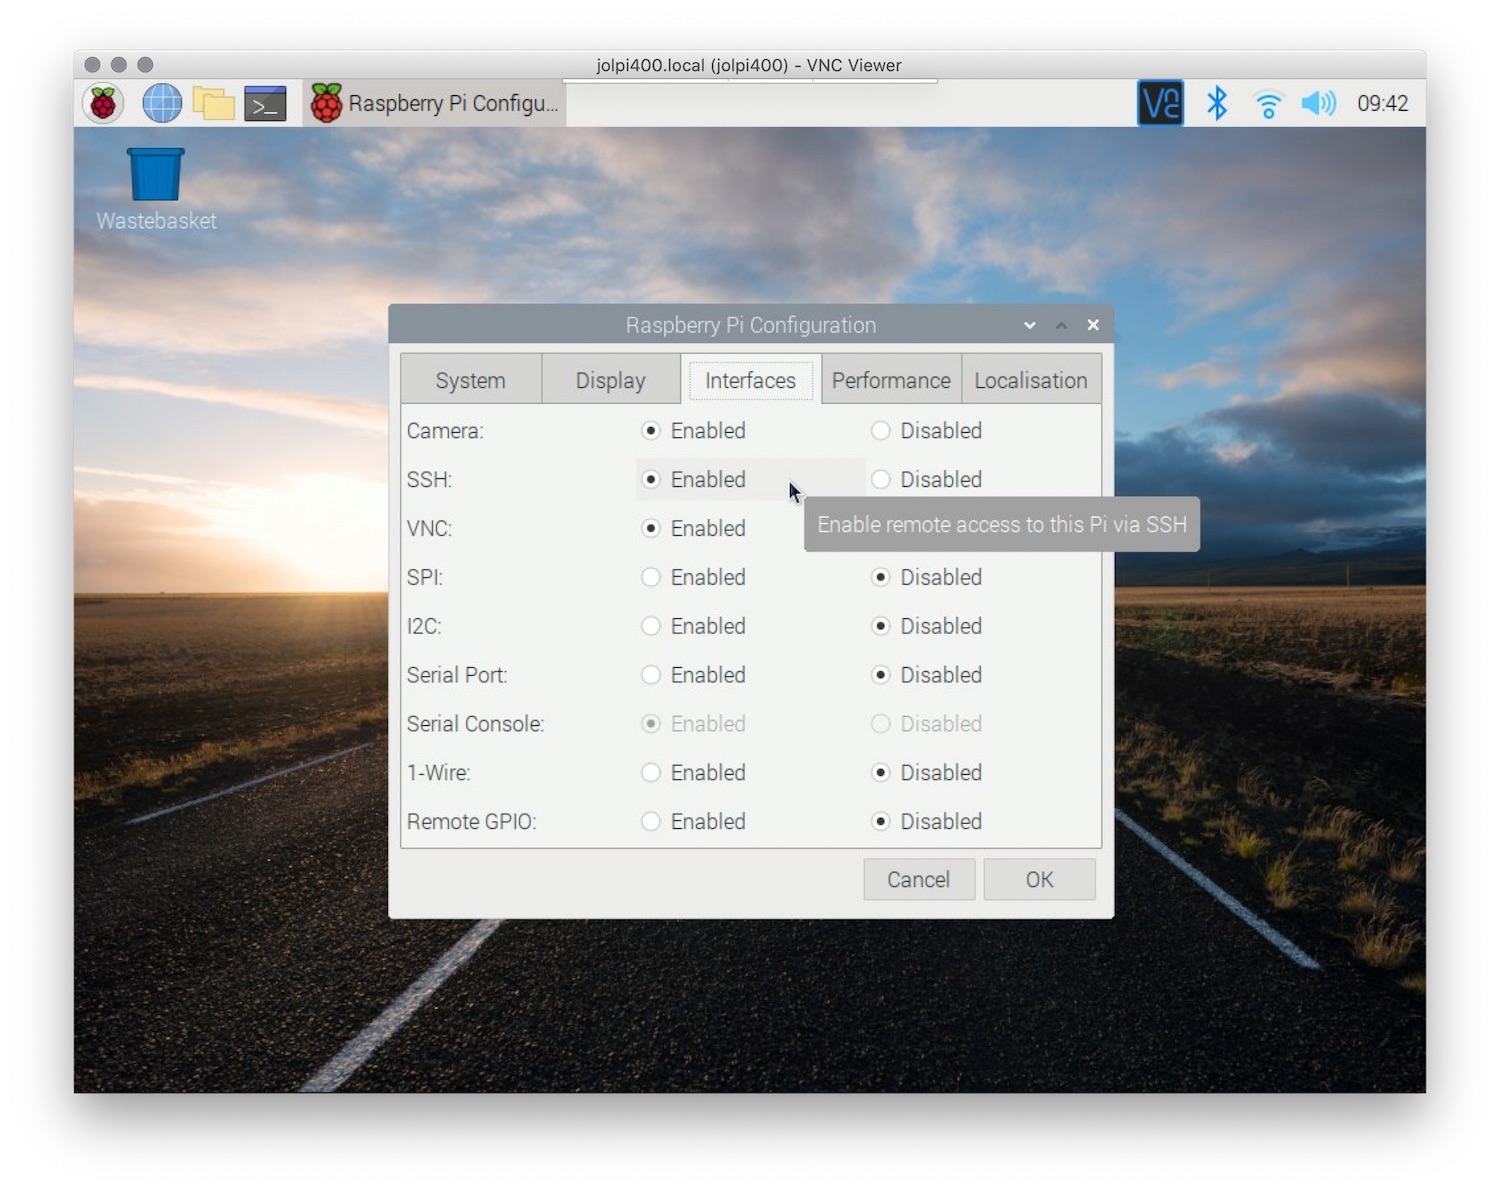
There are a couple of straightforward ways to do this. One common way is to use the Raspberry Pi Configuration tool, which you can find in the graphical desktop environment if you have a screen connected to your Pi. Inside this tool, there's a section called "Interfaces," and there you'll see an option for SSH. Just make sure that option is set to "Enabled." Once you save that change, your Pi will be listening for SSH connection attempts, which is quite important, actually.
Another way, if you're setting up your Pi without a screen from the start, is to create a special file on the SD card before you even put it into the Pi. You just make an empty file named "ssh" (with no file extension) in the main part of the SD card. When the Raspberry Pi starts up for the first time with this file present, it will automatically turn on SSH for you. This method is super handy for those who want to get their Pi running "headless" right away, and it saves you a step, as a matter of fact.
After you've made sure SSH is turned on, it's a good idea to know your Pi's network address, its IP address. This is like its street address on your home network. You can find this by typing a simple command, `hostname -I`, into the Pi's terminal if you have a screen connected. Write this number down, as you'll need it when you try to connect from your Windows computer. This number is how your Windows machine will know where to send its secure messages, and it's pretty essential, you know.
Why Does a Windows Firewall Make Things Tricky?
So, you've got your Raspberry Pi ready to listen for secure messages, which is great. Now, let's talk about the other side of the equation: your Windows computer. Most Windows systems come with a built-in protective shield, often called Windows Firewall. This shield is a really good thing, honestly, because its main job is to keep your computer safe from unwanted digital visitors and suspicious activity coming from the internet or even from other devices on your home network. It's basically a guard dog for your computer, and it does its job very well.
The way this protective shield works is by checking every bit of information that tries to come into or go out of your computer. It has a set of rules, and if something doesn't match those rules, it gets blocked. For instance, if a program on your computer tries to send information out, or if something from the outside tries to get in, the firewall looks at it. If it doesn't recognize the activity or if it thinks it's a risk, it simply stops it. This is why, when you try to connect to your Raspberry Pi via SSH, the Windows Firewall might see it as an unknown attempt to connect and just block it, which is kind of what it's supposed to do, in a way.
This protective behavior, while helpful for general security, can be a bit of a hurdle when you're trying to set up a specific connection, like talking to your Raspberry Pi. The firewall doesn't know that *you* want this connection to happen; it just sees an incoming attempt on a certain "port" – think of ports as specific doorways on your computer. If that doorway isn't usually open for such activity, the firewall will keep it shut. So, to make your SSH connection work, you need to tell the Windows Firewall that this particular doorway, for this specific type of conversation, is okay to open, at least for your Pi. It's a simple adjustment, but a necessary one, you know.
Making Space in Your Windows Firewall for Pi Connections
To get your Windows computer to allow the secure conversation with your Raspberry Pi, you'll need to make a small adjustment in its protective shield settings. This doesn't mean turning off the whole shield, which would be a bad idea for your computer's safety. Instead, you'll just add a specific rule that says, "Hey, this type of connection, on this particular digital doorway, is fine." It's like telling your guard dog that a specific friend is allowed to come through the gate, you know.
You can find the Windows Firewall settings by searching for "Windows Defender Firewall with Advanced Security" in your computer's search bar. Once you open that, you'll see options for "Inbound Rules" and "Outbound Rules." For connecting to your Pi, we're mostly interested in "Inbound Rules," because that's where information from your Pi would be trying to come *into* your Windows computer, if you were trying to host a server on Windows that the Pi connects to. But more commonly, for SSH *from* Windows *to* Pi, you might need to ensure your SSH client isn't blocked. Typically, Windows outbound rules are less strict, but it's worth a check, honestly.
For most uses of connecting *from* your Windows PC *to* your Raspberry Pi, you might not need to adjust the Windows Firewall at all, as outbound connections are usually permitted. However, if you are having trouble, or if you are trying to do something more complex like reverse SSH or host a server on your Windows machine that the Pi connects to, then you would create a new "Inbound Rule." You'd choose "Port" as the rule type, then specify the port number that SSH uses, which is usually 22. You'd then tell it to allow the connection. This tells your Windows protective shield to permit traffic on that specific doorway, so your Pi's messages can get through. It's a pretty simple process, actually.
When you create this new rule, you'll also have the option to specify which types of networks it applies to – like your home network, or public networks. For safety, it's a good idea to only apply it to your private or home network, if that's where your Pi lives. This keeps the rule from being active when you're on, say, a public Wi-Fi spot, which is a good security practice. Finishing up the rule means giving it a name, something like "Allow SSH to Pi," so you remember what it's for. This little adjustment makes a big difference in getting your secure conversation going, and it's surprisingly easy to do, just a little bit of clicking.
How Do We Get Through the Firewall Via SSH?
Once you've made sure your Raspberry Pi is ready to talk and your Windows computer's protective shield knows to let the secure conversation happen, the next big step is actually making the connection. This is where you use a tool on your Windows computer to send those SSH commands. Windows 10 and 11 actually come with a built-in SSH client, which is super convenient, so you don't usually need to download anything extra. This means you can open up a command prompt or PowerShell window and start typing your commands right away, which is pretty handy, you know.
To start the secure conversation, you'll type a simple command: `ssh pi@YOUR_PI_IP_ADDRESS`. Replace "YOUR_PI_IP_ADDRESS" with the actual network address you wrote down earlier for your Raspberry Pi. The "pi@" part tells the system that you want to connect as the default user on the Raspberry Pi, which is usually "pi." When you hit enter, the system will ask for a password. This is the password for your Raspberry Pi's "pi" user. Type it in carefully, and you won't see the characters appear on the screen as you type, which is normal for security reasons. After you hit enter again, if everything is set up correctly, you should see a prompt that looks like `pi@raspberrypi:~ $`, meaning you're now securely connected to your Pi and can send it commands, more or less.
Sometimes, especially if you're trying to reach your Pi from outside your home network, things get a bit more involved. This is where "port forwarding" comes into play. Think of your home router as another protective shield, but one that also acts like a post office. It directs incoming mail (or data) to the correct address inside your home. By default, your router blocks most incoming connections from the internet to keep your home network safe. So, to allow SSH traffic from outside your home to reach your Pi, you need to tell your router to forward specific types of incoming messages to your Pi's specific network address and SSH doorway, you know.
Setting up port forwarding involves logging into your home router's settings, usually through a web browser. Every router is a little different, but generally, you'll look for a section labeled "Port Forwarding," "NAT," or "Virtual Servers." Here, you'll create a new rule that says something like: "When a connection comes in on external port 22 (the standard SSH port), send it to the internal network address of my Raspberry Pi, also on internal port 22." This tells your router to open a specific path directly to your Pi for SSH connections, which is kind of important, really.
Setting Up Port Forwarding for Your Raspberry Pi
Getting port forwarding just right is a very important step if you want to reach your Raspberry Pi when you're away from home. As mentioned, your home router acts as a gatekeeper, and it needs specific instructions to let certain kinds of visitors through to your devices. Without this instruction, any attempt to connect to your Pi from the internet will just hit your router and go no further, which is a bit frustrating, honestly.
The first thing you'll need to do is find your router's administration page. You usually do this by typing a specific network address into your web browser, like `192.168.1.1` or `192.168.0.1`. If those don't work, you can usually find your router's address by checking your computer's network settings. You'll then need to log in, using the username and password for your router. These are often printed on a sticker on the router itself, or they might be the default ones if you haven't changed them. It's a good idea to change them if you haven't already, for better security, you know.
Once you're logged into your router's settings, you'll need to find the section for "Port Forwarding," "NAT," or sometimes "Virtual Servers." The exact name can vary a lot between different router brands and models, so you might need to poke around a little bit. Inside this section, you'll typically see an option to "Add New Rule" or "Create New Entry." This is where you'll put in the details for allowing SSH access to your Pi, which is pretty straightforward, you know.
For the new rule, you'll usually be asked for a few pieces of information. You'll need to specify the "External Port" (often 22 for SSH), the "Internal Port" (also 22 for SSH), the "Protocol" (usually TCP), and most importantly, the "Internal IP Address" of your Raspberry Pi. This is the network address you found earlier for your Pi. By putting in these details, you're telling your router: "Any incoming connection that tries to use port 22 should be sent directly to my Raspberry Pi at this specific internal address, also on port 22." It's like setting up a special delivery instruction for your Pi, and it's a very key step, really.
After you've saved the port forwarding rule, it's a good idea to restart your router, if there's an option to do so. This helps ensure that the new rule takes effect. Keep in mind that your home's public network address, the one the internet sees, might change from time to time if your internet provider gives you a "dynamic" address. If this happens, you might need to use a "Dynamic DNS" service, which keeps a consistent name linked to your changing address. This can be a bit more involved, but it's something to consider for truly reliable remote access, you know, especially for long-term projects.
Any Other Things to Keep in Mind for Via SSH Access?
Getting your SSH connection working through your Windows protective shield and router is a big accomplishment, but there are a few more things to think about to make your remote access even better and safer. One of the most important aspects is keeping your Raspberry Pi and your connection to it secure. After all, you're opening a doorway to your home network, and you want to make sure only you, or people you trust, can walk through it. Security is pretty important here, you know.
A really simple yet very effective step is to change the default password for the "pi" user on your Raspberry Pi. When you first get your Pi, the password is often "raspberry," which is very well-known. Anyone trying to guess your password would start there. So, changing it to something unique and strong – a mix of letters, numbers, and symbols – makes it much harder for unwanted visitors to get in. You can do this by typing `passwd` into the Pi's terminal once you're connected via SSH. It's a quick change that makes a huge difference in safety, honestly.
Another excellent security measure is to use what are called "SSH keys" instead of passwords. This is a more advanced way to connect, but it's much more secure. Instead of typing a password, you generate a pair of special digital keys: one "private" key that stays on your Windows computer, and one "public" key that you put on your Raspberry Pi. When you try to connect, your Windows computer sends a request, and your Pi checks if the public key matches the private key. If they match, you're let in without needing to type a password. This is much harder for bad actors to guess or steal, and it's a very good habit to get into for sensitive connections, you know.
Keeping Your Raspberry Pi Connection Secure
Beyond changing passwords and using SSH keys, there are other practices that help keep your Raspberry Pi and its remote connection safe. Regularly updating your Pi's software is a very basic but vital step. Developers are always finding and fixing little holes in the software that could be exploited. By running `sudo apt update` and `sudo apt upgrade` regularly on your Pi, you ensure you have the latest fixes and improvements. This helps keep your system patched up against known issues, which is pretty sensible, you know.
Consider changing the default SSH port (22) to a different, less common port number. While this isn't a foolproof security measure, it does make your Pi less obvious to automated scans that look for devices listening on the standard SSH port. It's a bit like moving your front door to the back of the house – it doesn't stop a determined person, but it does deter casual wanderers. If you change the port, remember to adjust your port forwarding rule on your router and your SSH connection command on your Windows computer to use the new port number. It's a small change that adds a little extra layer of obscurity, and it's something many people choose to do, you know.
Lastly, always be mindful of where you're connecting from. If you're using public Wi-Fi, for example, be aware that those networks are generally less secure. If possible, use a Virtual Private Network (VPN) on your Windows computer when connecting from public spots. A VPN creates a secure, encrypted tunnel for all your internet traffic, adding another layer of protection between your computer and the outside world. This means your SSH connection, even if it's already secure, gets even more privacy. It's a good general practice for any sensitive online activity, and it's definitely something to think about for remote access, you know, especially if you're out and about.
- Adriana Checkik Twitter
- Richard Ayoade Mandalorian
- Alex Honnold Siblings
- River Bend Pizza Photos
- Adriana Chechnik Twitter

How to Connect via SSH to a Raspberry Pi – Tony Teaches Tech

SSH: Remote control your Raspberry Pi — Raspberry Pi Official Magazine
How To Remotely SSH Into A Raspberry Pi Behind A Firewall On Windows
